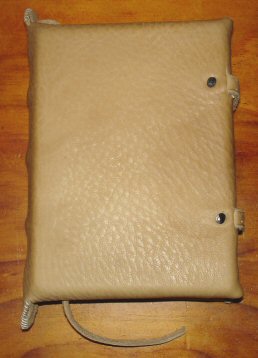
Fig 1: The finished book.
Crispin Sexi (Jaysen Ollerenshaw), November 2007.
Fig 1: The finished book.
This article details my first attempt at constructing a "Carolingian" style binding, as detailed in The Archeology of Medieval Bookbinding by J.A. Szirmai. This style was in use (and of course evolving) from the 8thC through to the 12thC in Europe. There was a range of different innovations and design changes. In making my book, I generally selected design features that I gathered would be applicable to the earlier part of the time scale (i.e. 9thC) in England. Only the features I selected are detailed here; if you want to see a more complete list, you'll have to track down the book.
Fold your paper in half once or twice and make it into quires. I use two pieces of A4 paper, folded twice, with one inserted inside the other to make one quire.
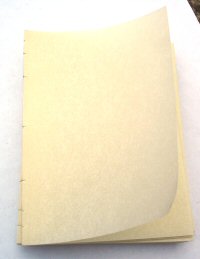
Fig 2: The stacked text block.
Stack the quires to make the text block, and knock it on all sides against the table to make it neat and even. Clamp it together and use a sharp knife to cut sewing slits along the spine at the following intervals: 1/16, 1/8, 1/4, 1/2, 3/4, 7/8 and 15/16. Each slit should be 3mm into the spine. The slits closest to the ends are for sewing the endbands, the next in from either edge are for the kettle stitches and the three remaining slits are for the cords.
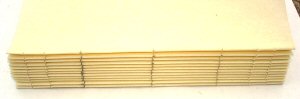
Fig 3: Spine of the text block, showing the slits ready for sewing.
The boards used for the front and back cover should be 10 to 13mm thick, with a preference for 10mm.
The wood should be oak for preference, though beech, fruit tree and poplar were also used. Oak is hard to get in Australia, so I opt for any reasonably hard wood that's the right thickness.
The boards need to be cut to the same size as your text block and given a bevelled edge all away round on the outside, about a third of the thickness of the board.
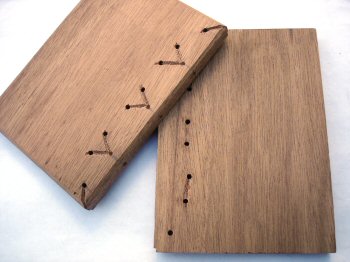
Fig 4: The boards.
The covers are attached by three sets of double cords threaded through holes drilled into the boards. Prepare the boards by drilling three holes at 45-degree angles through the centre edge of the spine of the boards to the outside of the covers. These holes should be spaced to divide the spine edge into quarters, and match up to the sewing slits cut in the text block earlier. Use a drill bit that will snugly fit two strands of your cord.
Next to the exit points of each of the holes you've just drilled, measure out roughly 1.5cm and drill two more holes straight through the boards. This will make three triangles when looking at the outsides of the boards and a rough row of holes looking at the insides.
Select a smaller drill bit and drill holes straight through the boards approximately 1cm from the spine corners. These holes need to be wide enough to accept the sewing thread used on the end bands.
Use a knife to carve channels between the three pairs of holes on the insides of the boards. On the outsides of the boards, carve channels linking the pairs of holes to the hole to the edge, making a V shape.
Use 1.5mm hemp or linen cord. The treading will be done in one long strand, but when the spine is later sewn, the arrangement will be treated as sets of paired cords. Starting at the inside of the back cover, thread the cord through the first of the pairs of holes, then along the channel into the hole to the spine. Leave a 6cm gap between the boards, then thread the cord into the corresponding hole in the spine of the front cover, upwards along the V to the top of the pair of holes and through the to inside of the front cover. Continue along the channels and through the holes until you have the cover boards joined by pairs of cords, with a 6 cm space between the halves.
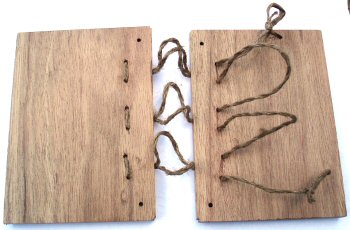
Fig 5: The boards, now attached using one continuous cord.
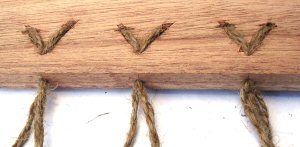
Fig 6: The cords, attachment as seen from the outside.
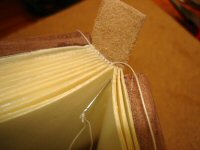
Having the cords already attached to the boards means you don't need a sewing frame, but it does make sewing a little more awkward than normal. Position the first quire on the inside of the front cover and sew in through the spine at the 1/8 slit. Then, carry the thread along the inside of the fold to the first of the cord holes. When sewing the cords, use herring-bone stitch, going out the slit between the cords, under the cords around the stitch from the previous quire and between the cords back into the slit. Use link-stitch (kettle stitch) at the next slit past the cords and carry on sewing the next quire onto the cords.

Fig 7: Sewing on the quires.
When all the quires are sewn on, tighten the cords on the inside of the back cover and tuck the ends back into the holes through the boards. You might wish to plug them to hold them in place. Cut off the excess.
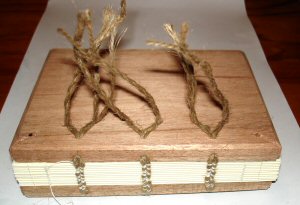
Fig 8: Cords pulled and tucked back through to the outside of the boards.
Trim the text block level with the boards, using a draw knife. This is very hard to do neatly, but don't worry; the real medieval ones were not neccesarily very neat either.
At this stage I also carved out notches on the edge of the front cover to accomodate the end of the strap used to fasten the book closed, and drilled corresponding holes to insert the peg in the edge of the back cover.
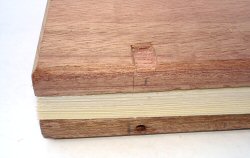
Fig 9: Text block cut flush with boards. Note the notch for attaching the strap and hole for the pin.
Cut two tabs of the same leather as the cover, as wide as the cover and about 2.5cm tall. Place these tabs against the spine and sew through them while making the endbands. The endbands are link-stitched, and sewn down to the first slit on the inside of the quire then out, through the leather tab, to the end of the spine and back in through the tab again. You should end up with a row of parallel stitches on the leather tab, a line of link-stitches on the inside corner between the tab and the text block, and two free ends long enough to thread through the holes near the corners of the boards.
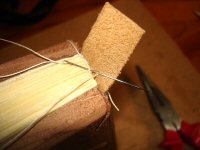

Figs 10-12: Sewing the endbands.
The cover should be 2.0mm to 3.5mm thick chamois leather, cut leaving a 3cm border all the way around the book for turning in. Rather than glue (as used in later techniques), use starch paste and apply it liberally all over the flesh side of the leather for pasting the leather onto the boards. Press the spine of the book onto the leather in the corrent position. Now lean the book down on the front cover, collecting the leather as you go, then the back cover. Rub the leather on, attempting to smooth it evenly over the boards then put it under a heavy flat weight or in a press for a few minutes.
Take the book out again and cut tabs in the excess leather at the spine and mitre the corners. Apply paste to the turn-ins and turn in the top, the bottom and then the edge in turn for the front and back cover. Put in a piece of scrap paper and close the book again.
(Sorry for the lack of photos at this point. Pasting the cover on is not an easy process to pause in the middle of.)
Attach a loop of leather and a ring to the edge of the front board, through a slot cut in the leather, and secure it in place with a tack or rivet. Attach a pin for the ring to latch on to into a hole drilled into the edge of the back board. Sew the loop of leather flat with saddle stitch along either edge to make it into a neat strap and hold the ring in place. I used running stitch to save time.
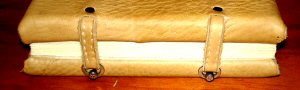
Fig 13: Leather attached and clasps in place.
The endpapers are the blank first and last pages of the text block. Paste them down, and close the book. Leave it under a heavy book for a day to dry. You might wish to put a scrap piece of paper between the endpaper and the rest of the text block to absorb moisture.
Trim the left-over tabs from the cover and the endband to both be semi-circular, the same size. Attach a piece of leather thonging for a bookmark to the top endband tab through a hole or two. Use whipstitch to sew the cover tab and the endband tab together to make them neat.

Fig 14: Top endband sewn, with bookmark.
That's it - all done!
My book is quite a lot thinner than the examples I was following, and as a result has ended up with the boards thicker than the text block. I'm also unsure whether I should have tried to make the cords stand out more prominantly by pressing the leather down on the spine. Further decoration of blind-tooling or jewels can also be performed, however Szirmai did not go into stylistic details.
Szirmai, J.A., The Archeology of Medieval Bookbinding, Ashgate, Aldershot, 1999.
Also, thanks to Linda for generously lending me the above book.
Copyright Jaysen Ollerenshaw 2007. Free use for non-profit.
Joan & Crispin's Homepage: http://aelflaed.homemail.com.au/